Yesterday my son came into the living room just before he planned to go out to see his friends, in his hot and sticky mitts he held a big bundle of his MTG cards and uttered the words "Mum, have you got a box to fit these?" The answer was simple, "No - but I can make you one!"
For quickness I hauled out my WRMK Gift Box Punch Board but as the box size he needed was bigger than A4 I had to use a thinner 12x12 than I would normally (sorry Son as much as I love you, I'm keeping the IndigoBlu good stuff for myself!).
As a temporary measure the MRK one was fine but he really needed something a bit stronger for storing them & taking to games so last night I came up with this - my son reckons it holds just over 100 cards in their sleeves.
As a temporary measure the MRK one was fine but he really needed something a bit stronger for storing them & taking to games so last night I came up with this - my son reckons it holds just over 100 cards in their sleeves.
 Originally it just had his name on each short end and the die cuts from Spellbinders Victorian Heart set on the lid and long sides under the notches but it was a case of "Oh Mum, you put a heart on it!" I explained it was in the Victorian Gothic style (I didn't say anything about the ones on the sides which are stylised roses) and offered to add a spot of steampunk to it by adding a few cogs. He now is a happy bunny!
Update:
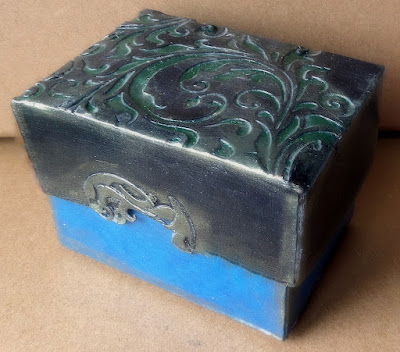
After posting this originally, my son asked me if I could make him another box. He informed me he would like it with a blue base and a black & green lid which was to have a flourish design on it. I had just received the new Tim Holtz Mixed Media #2 so I put it to use! The black & green card had some CS Antique Green Gold gilding wax which has given it an almost metallic/verdigris look.
Once finished I gave the box a couple of coats of Decomache decoupage glue/varnish to hopefully add a bit of longevity to it - the lid of this one had around 5 coats as I wanted to make sure that cut filigree areas couldn't lift or catch.
UPDATE:
Making a MTG BoxShould anyone else have a teenager who collects cards here is how I went about it:
 |
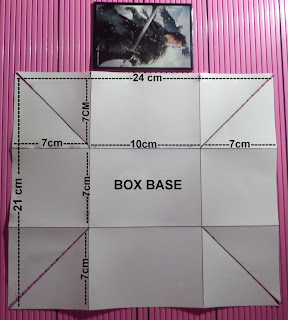
| Diagram 1 |
I took a ruler to the card and then rounded up the measurements to the nearest centimetre and came up with a box base which measures 7x10x7cm, Diagram 1.
 |
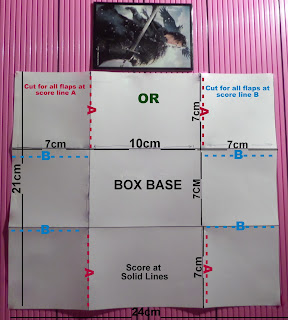
| Diagram 2 |
The lid has shorter sides but the central top section is half a centimetre bigger all round that the centre section of the base so that it will fit easily. The box base requires a piece of card (I used 300gsm) 24 x 21 cm and the lid 18.5 x 15.5 cm which means the box can be made from 2 pieces of A4 card or a single sheet of A3.
 |
| Diagram 3 |
I have shown the templates with the diagonals of the four outer squares cut for folding into the box. However, when making Liam's box I used a different method as I wanted to add to strength by using the flaps. Using the A cutting lines gives strength to the long sides and using the B lines adds strength to the short sides. All flaps were glued on the inside of the box.
Making up the Box:
The pictures below are of the lid being made up but the principle is the same for the base:
 |
| Flaps cut at A as shown on Diagram 3 |
The finished version:
He changed his mind about the Spellbinders Victorian Heart so I teamed it up with the bracket die from Spellbinders Outrageous Butterfly Set


No comments:
Post a Comment