Showing posts with label Cosmic Shimmer Gilding Wax. Show all posts

Monday, 3 April 2017

18th Birthday

April 3rd is a big day in our household.  This year it marks two big events, for hubby it's the 35th Anniversary of the Defense of South Georgia at the start of the Falklands Conflict*.   Hubby has just arrived back from the Reunion and Mess Dinner for the HMS Endurance & NP8901 Royal Marines which was held at the home of 42 Cdo, RM Bickleigh, Near Plymouth. 

* http://en.mercopress.com/2009/04/14/too-few-too-far-a-vivid-account-of-the-battle-of-south-georgia


Today also marks the day our son, Liam, turns 18.  He is just celebrating it quietly by having a small get together with some of his friends.

I had been saying to Liam I would like to get him something that he could say "I got that from Mum for my 18th" but he couldn't come up with anything he wanted that kind of fit the bill memento wise. In the end I decided to just make something for him or to be more accurate I found a wooden box that I could decorate for him as a Memory Box.

I used a lot of Tim Holtz dies to cut out elements in thick-ish cardboard (Amazon packaging to be precise!) and decoupaged them to the box along with assorted embellishments.  I has taken me what seems like a month of Sundays to do, probably due to the layers of varnish and gilding wax that have been built up on it to get an antiqued patina on it. 

It didn't quite come out how I envisaged it, not as many embellishments as I had intended to use but which didn't seem to look right when I tried them out.  Anyway, regardless of not looking as I intended, he loves it & that's the important thing.


I Used

Wooden box from stash

Decopatch - Black Crackle
Sizzix - Tim Holtz Mixed Media #2
Sizzix - Tim Holtz Cogs
Sizzix -  Just a Note Alphabet

Couture Creations - Sea Breeze Embossing Folder

Ranger - Tim Holtz Key Embellishments
The Works - Wooden Embellishments
The Works - Charm Embellishments

Cosmic Shimmer Gilding Wax
Cosmic Shimmer Polishing Wax


I kept Liam's card quite simple as I had been busy working on his memory box so used the sketch from Freshly Made Sketches
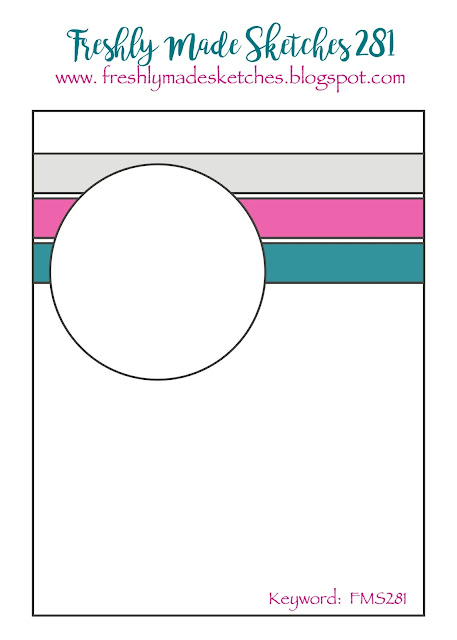


I had a set of three washi tapes bought from our local Poundland store so used them to create the banded effect.  I also stuck some to a piece of scrap card and used them to cut out the sentiment.







Monday, 13 June 2016

Friendship

It's been a few weeks since I've posted anything but things took an unexpected turn and there has been a lot happening.

A couple of weeks ago, and within the space of twenty-four hours, both my friend and her Brother-in-Law were rushed to hospital. My friend suffered a stroke less than 20 hours after her Brother-in-Law had a massive brain haemorrhage - needless to say it's been a rough time for her family.  Her B-i-L was being transferred to a hospital 30 miles away as she was in the ambulance going to the one he was leaving.

Both are currently still in hospital, however, things are beginning to settle down now and everyone is now getting in a routine. Instead now of taking my friend shopping or for a coffee it's visiting time with the impatient patient at the hospital
- she has told me that as soon as she's able I've to take her on a good day out, but not to Hobbycraft (as if!).

I decided to try this week's Freshly Made Sketches Challenge 


not sure if this first card fits the sketch - perhaps it is a loose interpretation, but then again . . . maybe not!

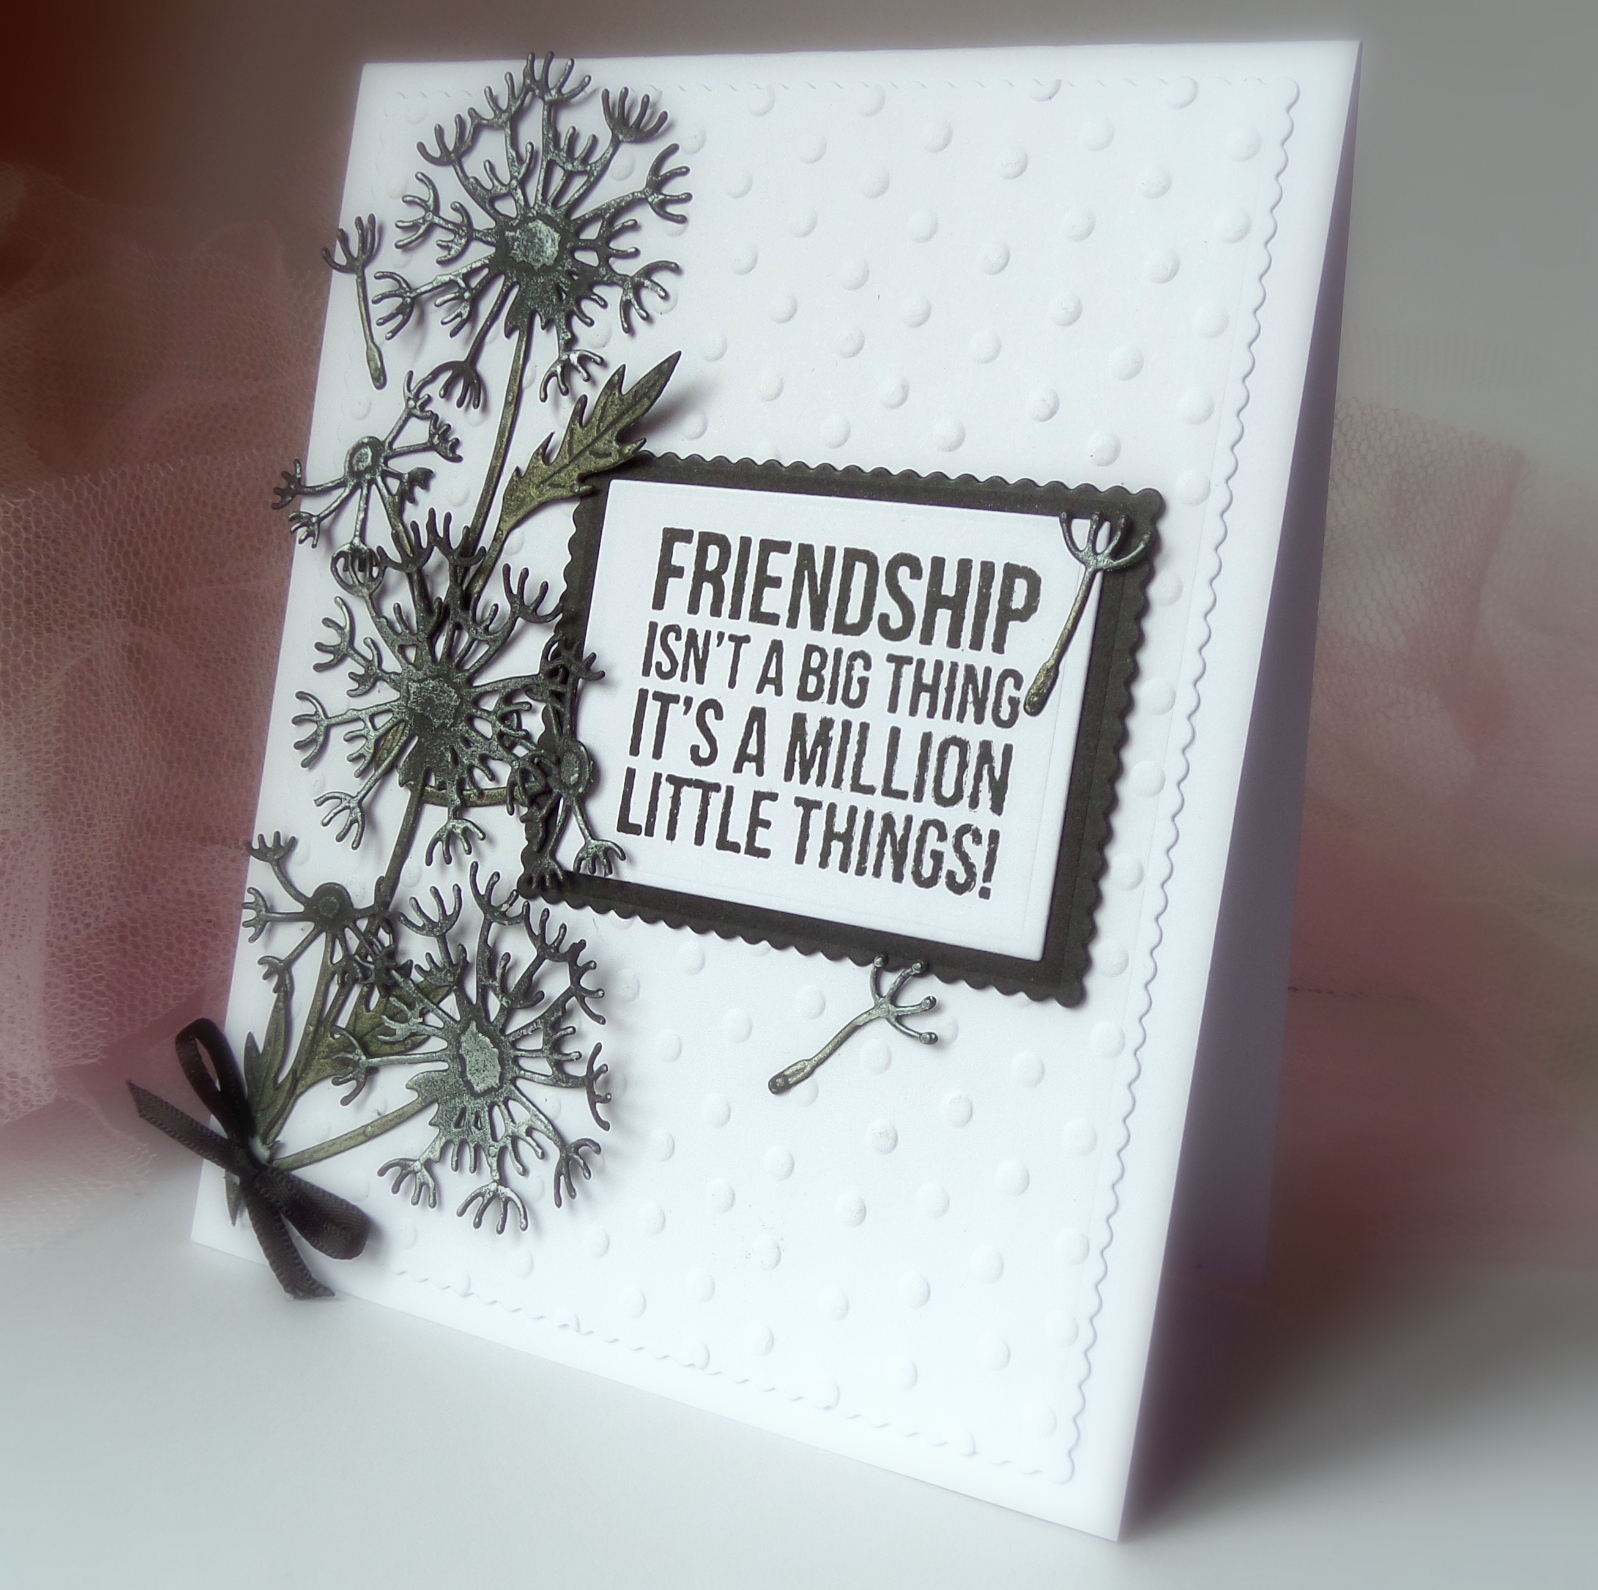
I've used three dandelion stems instead of the first three oblongs:


I used Spellbinders D'Lites Dandelion die set cut from black cardstock which was highlighted using Cosmic Shimmer Gilding Wax (Pearl Moon and Golden Green). The  sentiment stamp was from a Kaisercraft set. 


I thought I'd try something a little closer to the sketch the dandelion one and used my Cheery Lynn Pierced Banner die set for this one:


Tim Holtz Distress Inks were used to create two separate backgrounds one shades of blue and the other combining various blues, yellows and orange. The plain blue was used as the background and the other used to cut the banners and Happy Birthday from. The Creative Expressions Happy Birthday was cut twice, the first was coated with clear embossing powder but didn't seem to stand out enough so I cut a second and used a gold embossing powder which I layered it over the first to create a drop shadow. The ribbon was also coloured using the Distress Inks.


Sunday, 27 March 2016

Life's An Adventure

Only a week to go until my boy turns 17 and I make good on the promise I've made to him over the many years he's asked me "When I'm old enough, will you teach me to drive?" So next Sunday I'm going to give him his first driving lessons! It's been a while since I've taught so the lesson plans are being dug out from the depths of my filing system and I've got some homework to do to see what changes there have been to the test! I've decided not to do it all myself so after the initial couple of hours of basics he will be going out with an ADI & I'll be taking him out for practice sessions. As I no longer have a dual controlled car I've hired one for two hours next Sunday afternoon - hopefully we each will still be in one piece afterwards & able to go out to his favourite Chinese restaurant for a Birthday buffet!


I was out shopping the other day & spotted a couple of paper crafting magazines which had some nice freebies with them. After trying to decide which one to get and not making up my mind I finally decided I'd been good enough to treat myself to both! One was "The Cardmaker's Collection" featuring dies, embossing folder, stamps & paper samples from Couture Creations latest collection "Sea Breeze" - just the thing for making some men's cards. I love the embossing folder! I was also pleased there was an anchor die as it may well come in handy for some wedding décor next year. In the meantime the collection will come in handy for this week's Freshly Made Sketches Challenge


I did make a wee mistake, I forgot to check which way up the card blank was and stuck the already rope-stamped blue card the wrong way around, hence the flipped layout. I only noticed when I was ready to put the "Framing the Breeze" panel on!


I started off with a 6" x 6" Kraft card base which was given a mat of light blue before adding a panel of white card embossed using the Sea Breeze "Framing the Breeze" folder. The card was then given a light brushing with "Faded Jeans" Distress ink and highlighted with Cosmic Shimmer's "Cast Bronze" gilding wax.


The light blue card was stamped with the knotted rope stamp in Vintage Sepia and two circles were cut out and stamped; one with a ships wheel and the other with a compass from a Hot off the Press set. The stamps were then heat embossed with a clear powder and lightly gilded. A die cut anchor in matt bronze metallic cardstock was placed in the centre circle of the embossed design.


I Used

Cardstock
Kraft Card 6x6" Blank - Hobbycraft
White Supersmooth -
Blue - American Crafts "Summer" 12x12"

Dies, Stamps, Embossing Folders
Anchor Die - Couture Creations Sea Breeze Collection
Ships Wheel & Knotted Rope Stamps - Couture Creations Sea Breeze Collection
Framing the Breeze Embossing Folder - Couture Creations Sea Breeze Collection

Compass & Life is an Adventure Stamps - Hot Off The Press

Inks, etc
Vintage Sepia - Versafine
Faded Jeans - Tim Holtz Distress Ink
Cast Bronze Gilding Wax - Cosmic Shimmer


Sunday, 6 March 2016

Mum, Have You Got A Box?

Yesterday my son came into the living room just before he planned to go out to see his friends, in his hot and sticky mitts he held a big bundle of his MTG cards and uttered the words "Mum, have you got a box to fit these?" The answer was simple, "No - but I can make you one!"


For quickness I hauled out my WRMK Gift Box Punch Board but as the box size he needed was bigger than A4 I had to use a thinner 12x12 than I would normally (sorry Son as much as I love you, I'm keeping the IndigoBlu good stuff for myself!).

As a temporary measure the MRK one was fine but he really needed something a bit stronger for storing them & taking to games so last night I came up with this - my son reckons it holds just over 100 cards in their sleeves.


Originally it just had his name on each short end and the die cuts from Spellbinders Victorian Heart set on the lid and long sides under the notches but it was a case of "Oh Mum, you put a heart on it!" I explained it was in the Victorian Gothic style (I didn't say anything about the ones on the sides which are stylised roses) and offered to add a spot of steampunk to it by adding a few cogs. He now is a happy bunny!


Update:


After posting this originally, my son asked me if I could make him another box. He informed me he would like it with a blue base and a black & green lid which was to have a flourish design on it.  I had just received the new Tim Holtz Mixed Media #2 so I put it to use! The black & green card had some CS Antique Green Gold gilding wax which has given it an almost metallic/verdigris look. 


Once finished I gave the box a couple of coats of Decomache decoupage glue/varnish to hopefully add a bit of longevity to it - the lid of this one had around 5 coats as I wanted to make sure that cut filigree areas couldn't lift or catch.


UPDATE:

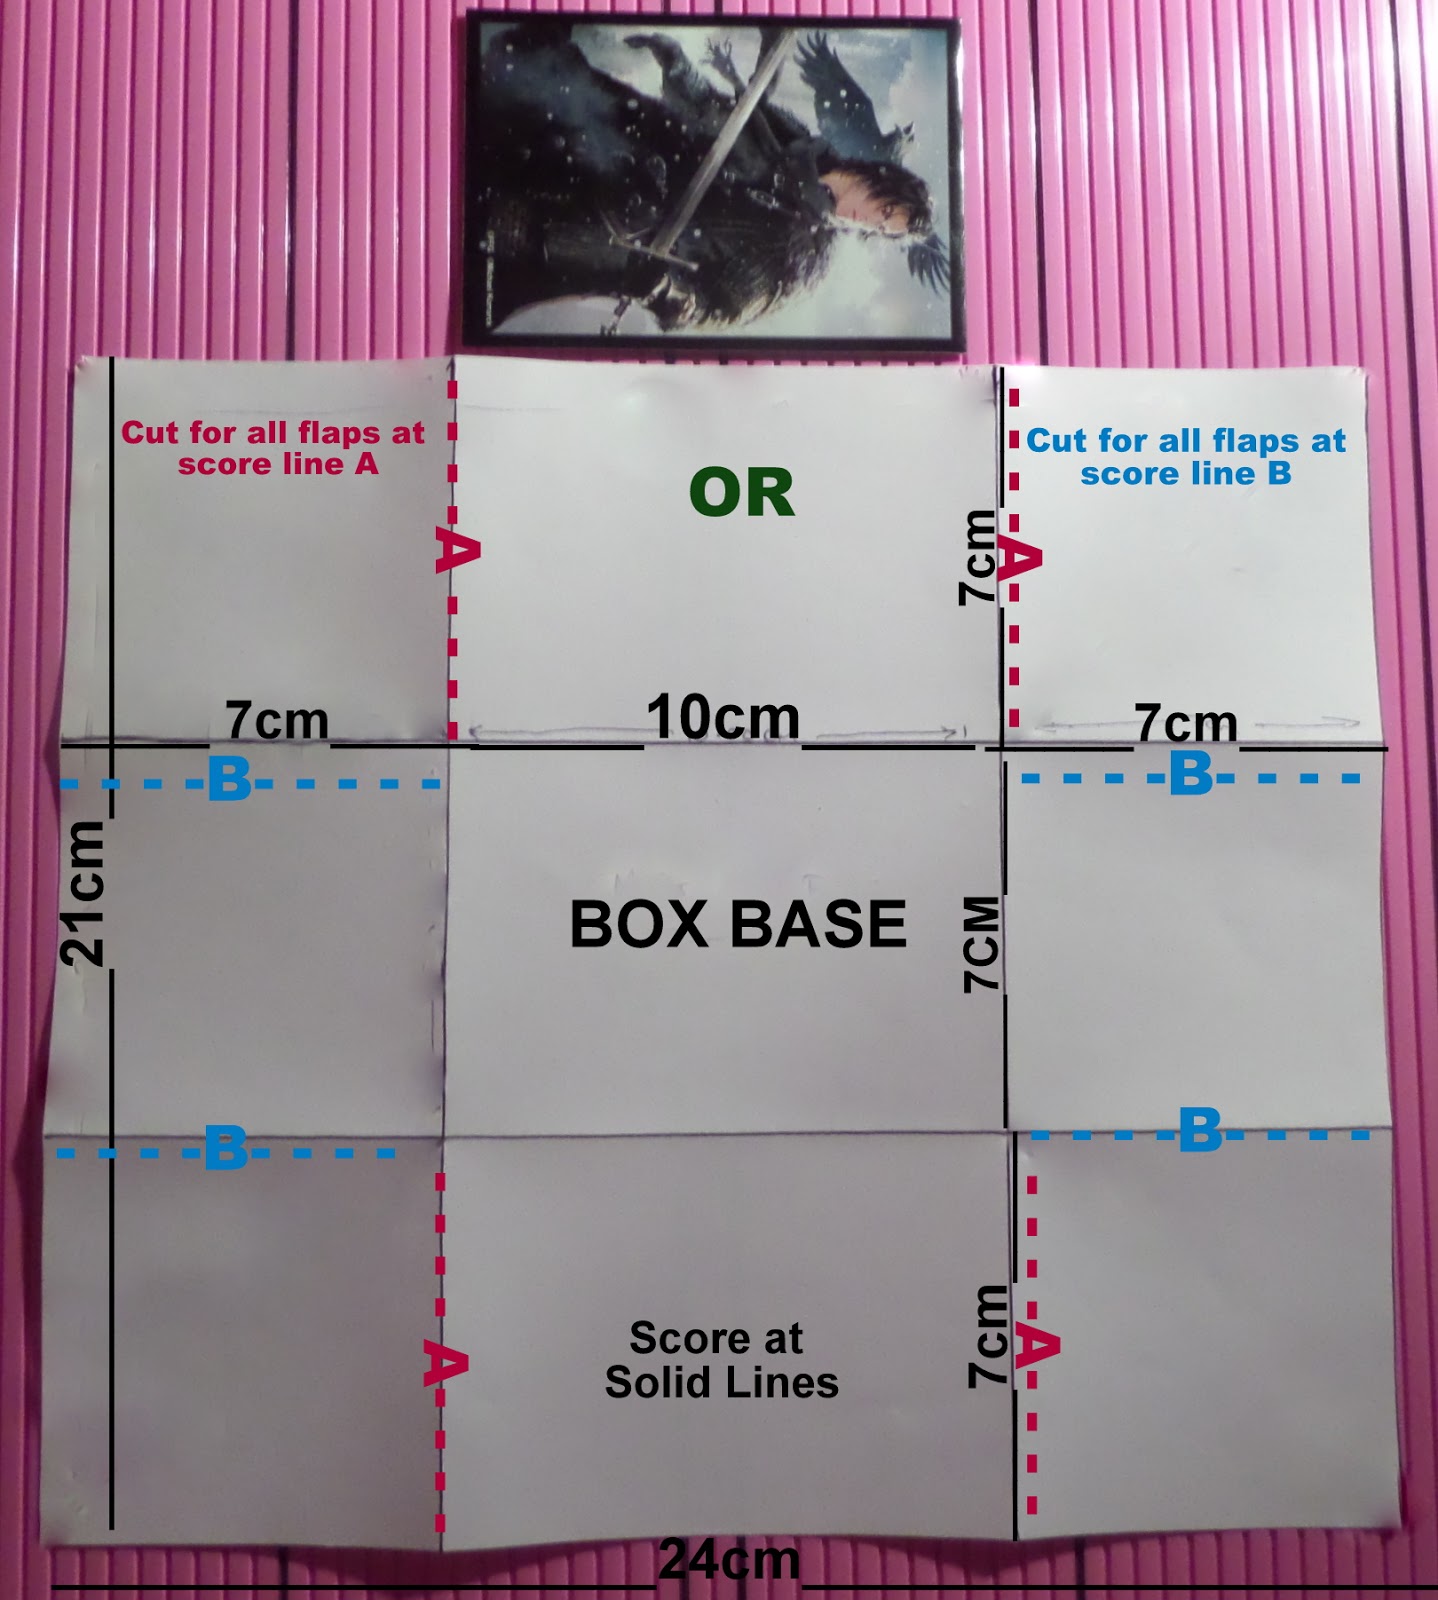
Making a MTG BoxShould anyone else have a teenager who collects cards here is how I went about it:


Diagram 1
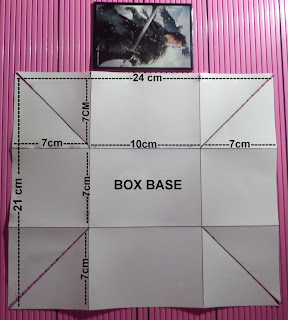
I took a ruler to the card and then rounded up the measurements to the nearest centimetre and came up with a box base which measures 7x10x7cm, Diagram 1.


Diagram 2
The lid has shorter sides but the central top section is half a centimetre bigger all round that the centre section of the base so that it will fit easily.  The box base requires a piece of card (I used 300gsm) 24 x 21 cm and the lid 18.5 x 15.5 cm which means the box can be made from 2 pieces of A4 card or a single sheet of A3.


Diagram 3
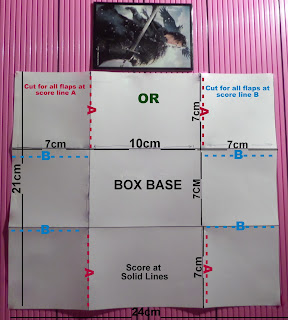
I have shown the templates with the diagonals of the four outer squares cut for folding into the box. However, when making Liam's box I used a different method as I wanted to add to strength by using the flaps. Using the A cutting lines gives strength to the long sides and using the B lines adds strength to the short sides. All flaps were glued on the inside of the box.


Making up the Box:
The pictures below are of the lid being made up but the principle is the same for the base:


Flaps cut at A as shown on Diagram 3


The finished version:


He changed his mind about the Spellbinders Victorian Heart so I teamed it up with the bracket die from Spellbinders Outrageous Butterfly Set