Sunday, 27 March 2016

Life's An Adventure

Only a week to go until my boy turns 17 and I make good on the promise I've made to him over the many years he's asked me "When I'm old enough, will you teach me to drive?" So next Sunday I'm going to give him his first driving lessons! It's been a while since I've taught so the lesson plans are being dug out from the depths of my filing system and I've got some homework to do to see what changes there have been to the test! I've decided not to do it all myself so after the initial couple of hours of basics he will be going out with an ADI & I'll be taking him out for practice sessions. As I no longer have a dual controlled car I've hired one for two hours next Sunday afternoon - hopefully we each will still be in one piece afterwards & able to go out to his favourite Chinese restaurant for a Birthday buffet!


I was out shopping the other day & spotted a couple of paper crafting magazines which had some nice freebies with them. After trying to decide which one to get and not making up my mind I finally decided I'd been good enough to treat myself to both! One was "The Cardmaker's Collection" featuring dies, embossing folder, stamps & paper samples from Couture Creations latest collection "Sea Breeze" - just the thing for making some men's cards. I love the embossing folder! I was also pleased there was an anchor die as it may well come in handy for some wedding décor next year. In the meantime the collection will come in handy for this week's Freshly Made Sketches Challenge


I did make a wee mistake, I forgot to check which way up the card blank was and stuck the already rope-stamped blue card the wrong way around, hence the flipped layout. I only noticed when I was ready to put the "Framing the Breeze" panel on!


I started off with a 6" x 6" Kraft card base which was given a mat of light blue before adding a panel of white card embossed using the Sea Breeze "Framing the Breeze" folder. The card was then given a light brushing with "Faded Jeans" Distress ink and highlighted with Cosmic Shimmer's "Cast Bronze" gilding wax.


The light blue card was stamped with the knotted rope stamp in Vintage Sepia and two circles were cut out and stamped; one with a ships wheel and the other with a compass from a Hot off the Press set. The stamps were then heat embossed with a clear powder and lightly gilded. A die cut anchor in matt bronze metallic cardstock was placed in the centre circle of the embossed design.


I Used

Cardstock
Kraft Card 6x6" Blank - Hobbycraft
White Supersmooth -
Blue - American Crafts "Summer" 12x12"

Dies, Stamps, Embossing Folders
Anchor Die - Couture Creations Sea Breeze Collection
Ships Wheel & Knotted Rope Stamps - Couture Creations Sea Breeze Collection
Framing the Breeze Embossing Folder - Couture Creations Sea Breeze Collection

Compass & Life is an Adventure Stamps - Hot Off The Press

Inks, etc
Vintage Sepia - Versafine
Faded Jeans - Tim Holtz Distress Ink
Cast Bronze Gilding Wax - Cosmic Shimmer


Friday, 18 March 2016

Spring!

The days are getting longer now and I'm looking forward to the clocks going forward to BST next weekend. The snowdrops have been out for a while and the daffodils are now getting into bud. One thing this town is renowned for (apart from the town planners extensive use of roundabouts in the roads system) is it's floral displays and in two or three weeks time the whole town will be a mass of yellow.
Earlier today I had gone out to get something from the car and as I came back up the path I spotted something pink I didn't expect to see - our miniature cherry tree was in flower! The reason for my surprise was that I had to prune it right back last year as the top half of it seemed to be dying back. I thought I'd prune it before it went any further down the stem. There is only a few branches at the base but they are all in flower so hopefully it may be on the road to recovery! Another reason I wasn't expecting cherry blossom is that the mature cherry trees are still bare.

It's my friend's Birthday next week. I did think about using the Crazy Cats stamps & dies cos she's cat crazy but as Spring is in the air I decided to use a new die, "Spring Garden" that I thought matched the "Ditzy Floral" embossing folder I had - both are Crafter's Companion so they at least have that in common!


I Used

Cardstock
Metallic Silver Card Blank - Docrafts
Pearlised White - PayPer Box

Dies & Embossing Folders
"Spring Garden" - Crafter's Companion
"Ditzy Floral" - Crafter's Companion

Ribbon & Bling from stash.


For this week's Freshly Made Sketches Challenge I decided to stick with a floral theme as I had bought a die and stamp set called "Beautiful You" in the Sizzix website sale that was still to be played with and thought I would give it a try using this sketch.

I had been going to use reds for the flowers but decided to use a pink instead as I felt it was more Spring-like. I spent ages going through my cardstock supplies looking for a matching background for the card base and was getting to the point where I thought I was going to have to change colour scheme then it dawned on me - what a numptie! This silly eejit somehow managed to forget how I normally matches the colours I'm colouring in with . . . use the same Promarkers! I swear I actually blushed in embarrassment when I realised!


I Used

Cardstock
White Pearlised - PayPer Box
White Supersmooth - Image

Dies
Beautiful You Set - Sizzix

Inks
Smokey Grey - Memento
Winsor & Newton Promarkers


Monday, 14 March 2016

With Love

There was a bit of nail biting going on this afternoon watching some Six Nations Rugby. The "Auld Alliance" was put to one side with Scotland taking on France at Murrayfield. France had won the last 9 matches they've played against Scotland & it didn't get off to a great start when they scored a try within the first few minutes and it was 0-5. My heart sank a little but the Scots lads came through in the end winning 29-18 - I was exhausted just watching them by the time the final whistle blew! Next week it's Ireland at Dublin, always torn with that match, whilst I like Scotland to win, the Irish blood in me is always happy when Ireland win too!

My Maid of Honour's nephew is getting married in May next year & boy does that makes me feel old! He was at a Wedding Fayre with his Fiancée yesterday and they saw some invitations they liked. Taking ideas from the photos of the ones they like, I've offered to do something for them - new dies on order (just so happens one was already on my wish list!).  It's only going to be a small family ceremony at the local castle Balgonie, (the castle appears in episodes 13 & 15 of "Outlander") followed by a larger function at a hotel for friends in the evening. So fancy cards for daytime and simple ones for night time - plenty of time to get them done too, hopefully I'm not being too ambition in the design of the family ones!  I think my MoH is also planning to sub-contract some of her contributions to the cause - there are hints being dropped!

I'm still slowly but surely working on the cards for the Cat Rescue charity but this sinus infection I've had for the last 3 weeks has been making me rather lethargic and my get up and go definitely seems to have got up and went. Having said that the Freshly Made Sketches Challenges have been great help for design inspiration and I did manage to do some colouring in of a couple of stamps although I'm not entirely happy with the results! Originally I thought about trying a technique I saw Sheena Douglass from Crafter's Companion do using Tim Holtz Distress Inks to paint with but I don't have any watercolour paper at the moment and the cardstock I do have doesn't really like getting wet.


The stamps I've used are from the Penny Black's "Hugs" set


Can't make up my mind to submit the Hedgehogs or these Mice so I may end up trying to sneak them both in!


I Used

Cardstock
SS Pearlised - Create & Craft
White - Image Supersmooth

Stamps
Penny Black - "Hugs"
Personal Impressions - Paula Pascal Mixed Sentiments

Inks
Tim Holtz Distress Ink
Winsor & Newton Promarkers


Thursday, 10 March 2016

Nine Lives

One of my oldest friends, we've known each other since we were but teenagers, now spends a lot of her time looking after rescue cats and is always looking for ways of raising funds to care for both those she rescues and for others who also carry out the same work at home and abroad. As part of her fund raising efforts I've offered to make cards she could sell and so I have been looking for more cat-themed stamps etc that would be suitable.

One of the sets I finally decided on was the Penny Black T for Transparent "Nine Lives" (I've also got the "You're Retro" Set on order too) so here are the first three cards I've made using them.


I think these stamps lend themselves rather well to little stories. In this one we have a puss who seems rather pleased with their efforts at performing a handstand!


This one seems to have just come up with a great idea!


As soon as I saw these next stamps I knew exactly the words I wanted to use with them so out came one of my Dyan Reavely sets - it's a Christmas set but just seemed to fit the expressions of these cats to a T!


I used

Cardstock
Linen DL Card Blank - Hobbycraft
Kraft 6 x 6 Card Blank - Hobbycraft
Other card - PayPer Box

Stamps
Nine Lives - Penny Black T for Transparent
Christmas Words - Dyan Reavely

Inks
Vintage Sepia - Versafine
Various - Promarkers

Monday, 7 March 2016

Friends Forever

I'd been having problems finding the new Tim Holtz Mixed Media #2 die set so decided to go to the source at Sizzix.  When I got to the Sizzix UK I discovered that they have a sale on at the moment . . .  so that "buy, buy" meant "bye, bye" to the rest of my craft allowance for a few weeks!

As well as the Mixed Media #2 set, which wasn't in the sale, they also had the Tim Holtz "Handwritten Love" set  for under £4 so that saved me quite a bit on what I almost paid for it a few weeks ago.  They arrived today so it was off to play the Freshly Made Sketches Challenge for this week!


This may be a little stretch of the sketch as the contrasting "mat" on the outside of the sketch is on the inside of mine . . .


I Used
Cardstock
White A5 Card Base - Home Bargains
Black - Payper Box

Dies, Stamps & Embossing
Flourish Die - Sizzix Tim Holtz "Mixed Media #2"
Friends Forever - Sizzix Tim Holtz "Handwritten Love"
Pierced Oval - Spellbinders "Radiant Rectangles"

Stamp - Inkylicious "Tinchie Fairies"

Embossing Folder - Couture Creations "Exotic"


Sunday, 6 March 2016

Mum, Have You Got A Box?

Yesterday my son came into the living room just before he planned to go out to see his friends, in his hot and sticky mitts he held a big bundle of his MTG cards and uttered the words "Mum, have you got a box to fit these?" The answer was simple, "No - but I can make you one!"


For quickness I hauled out my WRMK Gift Box Punch Board but as the box size he needed was bigger than A4 I had to use a thinner 12x12 than I would normally (sorry Son as much as I love you, I'm keeping the IndigoBlu good stuff for myself!).

As a temporary measure the MRK one was fine but he really needed something a bit stronger for storing them & taking to games so last night I came up with this - my son reckons it holds just over 100 cards in their sleeves.


Originally it just had his name on each short end and the die cuts from Spellbinders Victorian Heart set on the lid and long sides under the notches but it was a case of "Oh Mum, you put a heart on it!" I explained it was in the Victorian Gothic style (I didn't say anything about the ones on the sides which are stylised roses) and offered to add a spot of steampunk to it by adding a few cogs. He now is a happy bunny!


Update:


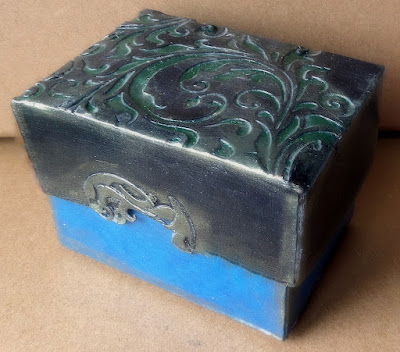
After posting this originally, my son asked me if I could make him another box. He informed me he would like it with a blue base and a black & green lid which was to have a flourish design on it.  I had just received the new Tim Holtz Mixed Media #2 so I put it to use! The black & green card had some CS Antique Green Gold gilding wax which has given it an almost metallic/verdigris look. 


Once finished I gave the box a couple of coats of Decomache decoupage glue/varnish to hopefully add a bit of longevity to it - the lid of this one had around 5 coats as I wanted to make sure that cut filigree areas couldn't lift or catch.


UPDATE:

Making a MTG BoxShould anyone else have a teenager who collects cards here is how I went about it:


Diagram 1
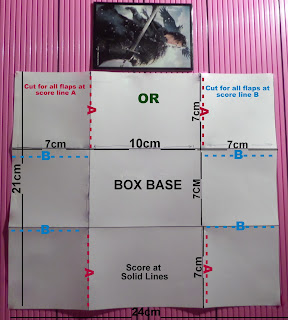
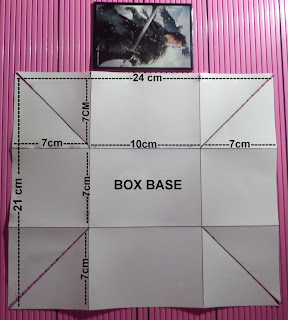
I took a ruler to the card and then rounded up the measurements to the nearest centimetre and came up with a box base which measures 7x10x7cm, Diagram 1.


Diagram 2
The lid has shorter sides but the central top section is half a centimetre bigger all round that the centre section of the base so that it will fit easily.  The box base requires a piece of card (I used 300gsm) 24 x 21 cm and the lid 18.5 x 15.5 cm which means the box can be made from 2 pieces of A4 card or a single sheet of A3.


Diagram 3
I have shown the templates with the diagonals of the four outer squares cut for folding into the box. However, when making Liam's box I used a different method as I wanted to add to strength by using the flaps. Using the A cutting lines gives strength to the long sides and using the B lines adds strength to the short sides. All flaps were glued on the inside of the box.


Making up the Box:
The pictures below are of the lid being made up but the principle is the same for the base:


Flaps cut at A as shown on Diagram 3


The finished version:


He changed his mind about the Spellbinders Victorian Heart so I teamed it up with the bracket die from Spellbinders Outrageous Butterfly Set